Yummy Butternut Squash Ravioli

OK, so I gave Hubby the choice between the butternut risotto and the butternut ravioli for tonight. I am SO glad that he chose this. This was SO delicious. I was worried that it would be too similar to the gnocchi that we love (with the orange veggie and brown butter sauce), that we wouldn’t … Continue reading “Yummy Butternut Squash Ravioli”

ravioli%20serving%20dish.jpg

OK, so I gave Hubby the choice between the butternut risotto and the butternut ravioli for tonight. I am SO glad that he chose this. This was SO delicious. I was worried that it would be too similar to the gnocchi that we love (with the orange veggie and brown butter sauce), that we wouldn’t like this, but it was FABULOUS!

Here is the original Epicurious recipe, but I ended up changing it around enough that it will be simpler for me just to write my version here for you, rather than list all of the modifications that I made, so here is my version:

Butternut Squash Ravioli

filling ingredients:
2 cups roasted, mashed, cooled butternut squash
(get it that way yourself – a one pound squash will yield about 2 cups)
1/2 medium-sized onion, chopped (about 2/3 cup)
2 tsp. chopped fresh sage
1 garlic clove, pressed or minced
1/3 cup grated hard goat cheese (I used Parrano)

1 stick unsalted butter
1 package won ton wrappers (there were 52 in my pack)
1/3 cup good quality fresh pecans, cut into large pieces (each pecan cut into about 6 pieces)

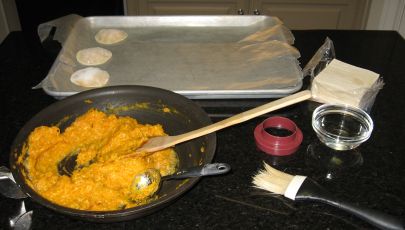
In a large bowl, mix together the squash and cheese. Saute onion, garlic and sage in 1 Tbsp. of the butter until onions are softened. Add to squash and stir well to combine. Put a large pot of water on to boil (I usually add a little salt and olive oil).

ravioli%20mise%20en%20place.jpg

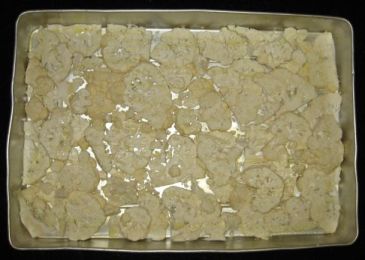
Working quickly so that won ton wrappers don’t dry out, put 1 wrapper on a clean work surface and place one level Tbsp. of squash filling in the center.

ravioli%20-%20before%20sealing.jpg

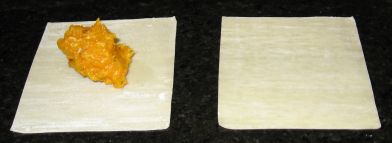
Brush the wrapper (around the filling) with water and a pastry brush (or a clean finger). Put a second wrapper over the top, push down around the filling to push out any air bubbles and seal the edges well around the filling.

ravioli%20filled%20uncut.jpg

Trim around the filling with a small round cookie cutter (the one that I used was a little less than 3 inches across).

ravioli%20with%20cutter%20on%20it.jpg

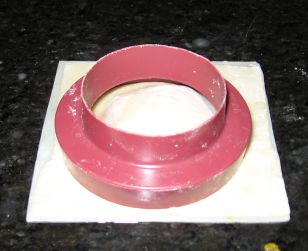
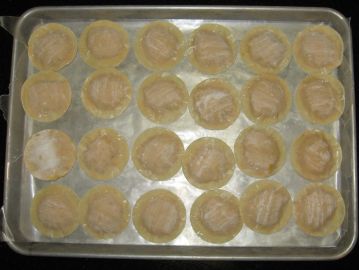
When you cut, don’t twist the cookie cutter, but cut straight down, so that sealed pasta edges will not become loosened. As ravioli are completed, place them gently on a cookie sheet lined with waxed paper. Repeat until all filling is used up.

ravioli%20uncooked%20on%20tray.jpg

Sit ravioli aside as you prepare the butter sauce. Place the remainder (7 Tbsp.) of the stick of butter in a skillet with the pecans. Cook over medium heat until the pecans are toasted and the milk solids have just started to turn brown. Season with salt and pepper to taste. Set sauce aside and keep warm.

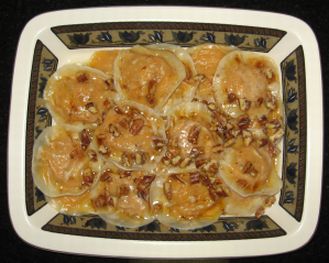
Cook ravioli, in 2 separate batches, in the boiling water for 1 or 2 minutes, until they start to float and are tender. Turn the heat down, if necessary, to keep the water from boiling too rapidly, which can make the ravioli come apart. Remove from the water with a slotted spoon or spider strainer. Set aside, slightly separated, on waxed paper or a lightly greased platter, so that they don’t stick together, until the second batch is cooked and you are ready to serve them. Pour brown butter sauce over them carefully, trying to get some sauce on each one, to keep them from sticking to each other.

Makes about 24 ravioli.

Other possible modifications:
More sage in the filling would be good. Some finely chopped toasted pecans in the filling would be nice, too. You probably don’t HAVE to have the goat cheese in the filling – parmesan would be fine, if that’s what you happen to have on hand. Hubby said these are so good they really don’t even need the sauce, but I’m not too sure about that. I REALLY like browned butter.

ravioli%20with%20dinner%20on%20plate.jpg

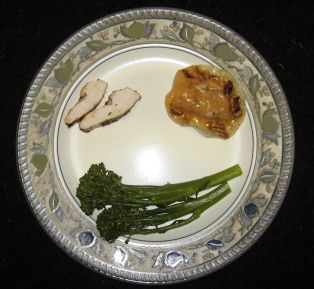
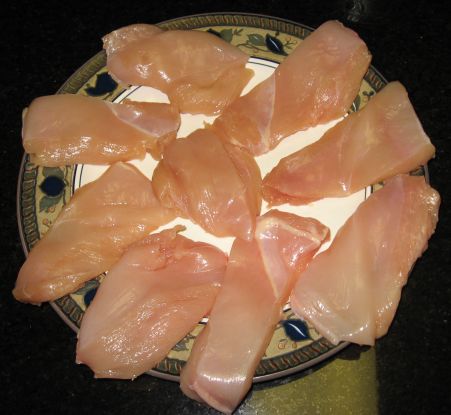
I served these with some herb-rubbed grilled chicken and some broccolini cooked with garlic and chicken broth. I accidentally overcooked the broccolini a little, but everything else was really good.

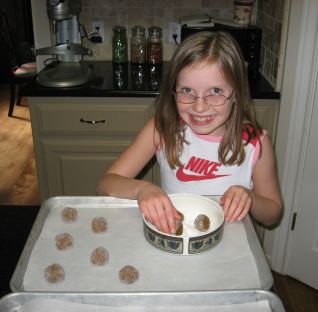
We didn’t get time to do the gingerbread house decorating tonight, but we have all of the “stuff” (candy canes, green gummy Life Savers to make a wreath on the front door, etc.) and will try to do them and post photos very soon.

BOOT CAMP!

I have started a new “boot camp” like exercise program and have been EXHAUSTED for the past couple of days and not cooking. I have to put “boot camp” in quotes, because Hubby is a former Marine and says that this couldn’t POSSIBLY be anything like REAL boot camp. Maybe not, but it’s plenty hard-core … Continue reading “BOOT CAMP!”

I have started a new “boot camp” like exercise program and have been EXHAUSTED for the past couple of days and not cooking. I have to put “boot camp” in quotes, because Hubby is a former Marine and says that this couldn’t POSSIBLY be anything like REAL boot camp. Maybe not, but it’s plenty hard-core enough for me – there was actually ICE on my workout mat yesterday (we meet outdoors at 5:30 am).

We don’t have much in the way of after-school activities today, though, so I’m planning on cooking something blogworthy. Haven’t decided what yet. It will either be Butternut Squash, Sage and Goat Cheese Ravioli with Hazelnut Brown-Butter Sauce or Butternut Squash, Rosemary and Blue Cheese Risotto. I have some roasted, mashed butternut squash that I prepared a while back and froze and I want to use it up. I made even do a simple Butternut Squash soup with some ginger.

I bought some plain (undecorated) gingerbread houses yesterday, too, and there may be enough time this evening for the kids to decorate them. I’ll post photos of them when they’re done, too. Will depend upon how much homework they have tonight.

Stay tuned!

Portugese Soup from The Inn at Brushy Creek

We are having a BIG cold snap here today, so it’s perfect weather for soup. I made this for dinner tonight. This recipe is from a now-closed restaurant called the Inn at Brushy Creek that used to be in Round Rock, just north of where I live. This soup was always the first course, served … Continue reading “Portugese Soup from The Inn at Brushy Creek”

p.%20soup%20-%20finished%20in%20bowl.jpg

We are having a BIG cold snap here today, so it’s perfect weather for soup. I made this for dinner tonight. This recipe is from a now-closed restaurant called the Inn at Brushy Creek that used to be in Round Rock, just north of where I live. This soup was always the first course, served in small bowls. It’s so hearty, though, that we just serve it in big bowls and make a meal out of it. It is SO easy to make, your house smells terrific while it’s cooking and it’s VERY kid-friendly (it’s got ketchup in it!). I’m going to go here and pick up a nice loaf of something yummy to go with it. Their Spinach Feta bread is delicious, but it does have high fructose corn syrup it it (their Honey Whole Wheat does not).

Portugese Soup from the Inn at Brushy Creek

2 white onions, chopped
6 cloves garlic, chopped or pressed
6 Tbsp. olive oil
1 pound garlic-flavored, smoked pork sausage, cut into bite-sized pieces
(Elgin sausage is great, if you happen to live nearby and can get it, or Linguica)
10 cups beef stock
2 cans kidney beans, with liquid
1 head green cabbage, cored and chopped into medium pieces
12 small new potatoes, scrubbed and quartered
1/4 to 1/2 cup vinegar (less to taste)
1 16-ounce bottle ketchup (more to taste)
salt and pepper to taste

Saute onions and garlic in oil.
p.%20soup%20-%20onions%20garlic%20in%20pot.jpg

When they are just transparent, add sausage slices and brown lightly.
p.%20soup%20-%20onion%20garlic%20sausage.jpg

Add beef stock and all other ingredients.
p.%20soup%20-%20other%20ingredients%20added.jpg

Bring to a boil, stirring often to keep the bottom of the pan from burning. Reduce heat, simmer 35 – 45 minutes or longer, stirring occasionally. Correct seasonings to taste. Yields about 1 gallon. Share this with your neighbors – because of the potatoes, this soup will NOT freeze well, but it will keep in the fridge for a couple of days.

Oven-Roasted (Caramelized) Cauliflower

SO good and SO easy. This roasting technique really brings out the sweetness in the cauliflower. Caramelized Cauliflower 1 head cauliflower 3 to 4 Tbsp. olive oil good quality salt, to taste (1/2 tsp?) Wash the head of cauliflower well and cut in half. Cut each half into 1/4 inch to 1/2 inch slices. Toss … Continue reading “Oven-Roasted (Caramelized) Cauliflower”

SO good and SO easy. This roasting technique really brings out the sweetness in the cauliflower.

cauliflower%20-%20completed.jpg

Caramelized Cauliflower

1 head cauliflower
3 to 4 Tbsp. olive oil
good quality salt, to taste (1/2 tsp?)

Wash the head of cauliflower well and cut in half. Cut each half into 1/4 inch to 1/2 inch slices. Toss with the oil, then lay flat in a large baking dish (I used a very large cake pan).
cauliflower%20before%20baking.jpg
Cauliflower, before baking.

Bake at 400 until it is lightly browned, about 15 – 20 minutes, stirring or turning once during cooking time (it will brown more on the bottom than it does on the top). Sprinkle with salt, toss gently and pour into a serving dish (it will soften and come apart a little during cooking and break into smaller pieces).

cauliflower%20after%20baking.jpg
Cauliflower, after baking.

Fresh Beets with Greens

Fresh Beets with Greens 2 bunches fresh beets 1 aseptic box chicken (or vegetable) stock – about 4 cups 1 tsp. olive oil salt to taste Cut beet roots away from greens. Scrub beets well and place in medium-sized pot. Pour stock over beets and heat to a simmer, covered, over high heat. When beets … Continue reading “Fresh Beets with Greens”

beets%20and%20greens%20cooked%20in%20serving%20dish.jpg

Fresh Beets with Greens

2 bunches fresh beets
1 aseptic box chicken (or vegetable) stock – about 4 cups
1 tsp. olive oil
salt to taste

beets%20-%20intact.jpg

beets%20-%20cut.jpg

Cut beet roots away from greens. Scrub beets well and place in medium-sized pot. Pour stock over beets and heat to a simmer, covered, over high heat.

beets%20in%20stock.jpg

When beets come to a boil, reduce heat. Keep covered and simmer (15 minutes or so?) until beets are fork-tender.

beets%20-%20simmering%20in%20red%20stock.jpg

The stock will become BRIGHT RED. Watch out for splatters on your clothes.

beet%20greens%20-%20cut%20and%20washed.jpg

While the beets are simmering, cut the greens into bite-sized pieces (as if you were cutting romaine hearts for a salad). Rinse well and dry (in a salad spinner). If the beets are REALLY fresh (from a farm or farmers market), you will be able to use most of the greens. If they’ve been sitting at the grocery store for a while (or in your fridge for a while after you brought them home), you’ll have to trim the leaves of the greens pretty judiciously. It’s much better to buy beets really fresh right before you’re going to cook them (especially if you plan to use the greens).

beet%20greens%20-%20starting%20to%20cook.jpg

Heat a little oil in a medium-sized saute pan. Add washed and dried greens and saute until softened (5 minutes or more – it takes longer than you’d think – you want them to be more than just wilted). Remove from heat and set aside.

beet%20greens%20-%20cooked%20in%20pan.jpg

Check beets. If a fork will pierce them easily, they are probably done. You want them to be about the same as potatoes that you are cooking for potato salad – tender to the bite, but not mushy.

beets%20cooked%20in%20pot.jpg

Remove beets from heat. Drain cooking liquid (it may have some grit in it from the beet skins and really shouldn’t be reserved for another use, although it may be tempting to think about using it in borscht).

Let beets sit until they are cool enough to handle. As soon as you can, rub the beets (I use my thumbs) so that the skin comes off. This should happen in one, easy motion, in large pieces. If it doesn’t, the beets may not be done enough. Once skins are removed, cut beets into serving sizes (you can halve or quarter them, or you may even choose to leave them whole, if they are small beets). Place in a serving bowl. Add greens to bowl (sprinkle salt in, if desired) and toss gently. Serve warm.

Here is an additional photo of some (small, golden) beets and greens that I made around February of this year. They were so beautiful that I had to take a photo at the time. My in-laws have a wonderful local organic farm and these beets (and the unusual green cauliflower) were from their place.

Beets%2C%20Cauliflower%20%26%20Filet.JPG

Chicken Marsala

Chicken Marsala has been one of our favorite meals for a long time, but a friend who is a culinary school graduate taught me this great technique for making the portion sizes smaller and making the pieces cook more evenly. I used to just cook a whole chicken breast for each of us (one for … Continue reading “Chicken Marsala”

chicken%20-%20completed%20with%20sauce.jpg

Chicken Marsala has been one of our favorite meals for a long time, but a friend who is a culinary school graduate taught me this great technique for making the portion sizes smaller and making the pieces cook more evenly. I used to just cook a whole chicken breast for each of us (one for Boy and Girl to share) and then be frustrated when we had so much half-eaten chicken left over. I think that when they are in smaller, flat pieces like this, they’re called a paillard, but I’m not positive about that. Anyway, I love this technique and use it every time I’m frying chicken and even sometimes when I’m marinating it to throw on the grill. Now I can actually feed my whole family (two adults, one 9-yr old and one 11-yr old) with one chicken breast – definitely a much more reasonable portion size!

Chicken Marsala

3 boneless (split) skinless chicken breasts
1 medium sized shallot
1/2 pound white button mushrooms, sliced
1 cup marsala wine (NOT “cooking wine”, which is salty and chemical-y tasting)
2 cups good quality chicken stock
dry, unseasoned bread crumbs (about 2 – 3 cups)
2 eggs
2 Tbsp. milk
1 cup all-purpose flour
salt, to taste
pepper (optional) to taste
1 tsp. chopped fresh (or 1/2 tsp. dried) rosemary
1 stick butter (you won’t need it all)
1/2 cup olive oil (you won’t need it all)

chicken%20-%20before%20cutting.jpg
Get everything ready: Put flour, egg/milk (whisked together) and breadcrumbs each in a separate bowl. Preheat oven (to 250 degrees) or warming drawer (medium-high).

chicken%20-%20cut%20into%20pieces.jpg
Cut each piece of chicken (with the “grain”) into 3 or 4 “chicken fingers”.

chicken%20-%20pounded.jpg
Gently pound each “finger” with the flat side of a meat tenderizing mallet, until it is a uniform thickness.

chicken%20-%20all%20pieces%20pounded.jpg
Repeat cutting and pounding for remaining chicken breasts. Gently sprinkle each chicken “paillard” with salt and pepper, if desired.

chicken%20-%20breaded.jpg
Lightly coat each piece of chicken with flour, then dip in egg/milk mixture to coat, then roll in breadcrumbs until completely covered.

chicken%20-%20all%20breaded.jpg
Repeat with remaining pieces of chicken.

chicken%20-%20shallots%20chopped.jpg
Finely chop the shallot.

chicken%20-%20olive%20oil%20and%20butter%20in%20pan.jpg
Heat 2 Tbsp. butter and 2 Tbsp. olive oil in large skillet over medium-high heat until bubbly.

chicken%20-%20shallots%20sauteeing.jpg
All shallots and saute until softened.

chicken%20-%20mushrooms%20in%20pan.jpg
Add mushrooms and cook until softened.

chicken%20-%20setting%20mushrooms%20aside.jpg
Pour cooked mushrooms and shallots out into a bowl and set aside, reserving as much of the oil/butter in the pan as you can. Add more butter and oil to the pan until you have enough to cover the bottom of the pan. Heat over medium-high until melted and bubbly.

chicken%20-%20frying.jpg
Add crumb-coated chicken to skillet and fry, being careful not to crowd the pieces. Adjust heat and add more butter/oil, as necessary. Watch pieces carefully; turn them over and cook the other sides. Remove chicken from pan as pieces are completely cooked and set aside on a large platter.

chicken%20-%20frying%20other%20side.jpg
Repeat with remaining pieces of chicken until all pieces are cooked through and crumb coating is browned on both sides. Place platter of cooked chicken in heated oven or warming drawer. Lower heat on pan.

chicken%20-%20adding%20marsala.jpg
Add marsala slowly and carefully to pan (it may sizzle, bubble and splatter!), stirring gently to scrape browned bits off bottom. Slowly raise hit and simmer until wine has reduced and thickened.

chicken%20-%20adding%20stock.jpg
Slowly add chicken stock, continuing to simmer, stirring, until sauce is thickened.

chicken%20-%20mushrooms%20%26%20shallots%20back%20in.jpg
When sauce has thickened to ALMOST serving consistency, add mushroom/shallot mixture back to pan, sprinkle in rosemary and stir to combine. Pour over warm chicken on platter and serve.

Pumpkin Waffles with Maple Whipped Cream

Since we’re having a fairly relaxed holiday weekend around here, we felt like making a luxurious breakfast this morning. I used the same pancake/waffle mix to make the waffles that I used for the pancakes a while back (see previous entry here). To make the maple whipped cream, I just whipped about 1/2 cup of … Continue reading “Pumpkin Waffles with Maple Whipped Cream”

pumpkinwaffletable.jpg

Since we’re having a fairly relaxed holiday weekend around here, we felt like making a luxurious breakfast this morning. I used the same pancake/waffle mix to make the waffles that I used for the pancakes a while back (see previous entry here).

To make the maple whipped cream, I just whipped about 1/2 cup of heavy whipping cream until it was fluffly, then blended in about 1 tsp. sugar and 1/2 tsp maple extract. We topped the waffles with syrup/pumpkin butter, etc., then added a little dollop of the whipped cream, then a sprinkle of cinnamon. Mmmmm…..we won’t need to eat again until dinnertime!

pumpkinwaffleplate.jpg

Butternut Squash Bread Pudding

I made this savory bread pudding to take to our family Thanksgiving dinner. It’s from the new Cooking Light cookbook. The recipe can be found on their website here. This is the bread pudding before baking. Overall, I thought it was a really good recipe and would probably make it again, but for Thanksgiving, it … Continue reading “Butternut Squash Bread Pudding”

ButternutSquashPlate.jpg

I made this savory bread pudding to take to our family Thanksgiving dinner. It’s from the new Cooking Light cookbook. The recipe can be found on their website here.

ButternutSquashBreadPudding.jpg
This is the bread pudding before baking.

Overall, I thought it was a really good recipe and would probably make it again, but for Thanksgiving, it was maybe not the greatest choice, but it was too similar to the stuffing and having both at the same meal was a bit much. I might be tempted, in the future, to add a little chopped, sauteed celery to it and serve this INSTEAD of stuffing, but it’s definitely not necessary to have both. It was yummy, though, and rich. I used a really good parmesan (Reggiano, my favorite), so the cheese flavor really came through. The technique for cubing and then roasting the butternut squash was really handy, too, and I will probably prepare it again that way for adding to salads, veggie sautes, even an omelet or some cooked rice or pasta. The squash that I started with was HUGE, so I roasted all of it and froze what I didn’t need for this recipe, so watch out for butternut squash ravioli or risotto or soup or something on the blog really soon.

I also made a batch of the gnocchi – again – I think that I have them perfected now. They received rave reviews. I also made this salad again – also very well received. I also brought along a batch of the Swedish Spice cookies.

Grandma Louise’s Fudge

This fudge recipe is SUPER rich and delicious – very sinful. It’s VERY easy to make and makes a great holiday gift. My dad is absolutely powerless to resist this stuff. It was his mother’s recipe, but she passed away 11 years ago, so I make it for him every once in a while now. … Continue reading “Grandma Louise’s Fudge”

fudge%20on%20plate.jpg

This fudge recipe is SUPER rich and delicious – very sinful. It’s VERY easy to make and makes a great holiday gift. My dad is absolutely powerless to resist this stuff. It was his mother’s recipe, but she passed away 11 years ago, so I make it for him every once in a while now. It can be frozen for surprisingly periods of time without much ill effect. This should not be made on a rainy or very humid day – it won’t “set” properly.

I made this batch without nuts, at the special request of Girl, who is not a fan of most nuts. The nuts are optional, but it’s really much better with pecans in it. If you do add the nuts, though, make SOME effort to secure decent ones – the Planters in the bag from the supermarket will absolutely NOT do. Get good ones, even if you have to special-order them. There are lots of things that I do NOT like about living in Texas, but one of the good things is that we are able to secure really good pecans. My grandparents (on my mom’s side) are my “suppliers” and always seem to know a great local source. Thanks, Granny and Pappaw! I love you!

Grandma Louise’s Fudge

1/3 cup butter
1 can evaporated milk
(The original recipe says a 14 1/2 ounce can, but they don’t make those anymore, so I just use one 12 ounce can, plus a couple of ounces from another can to make 14 1/2 ounces. Any milk that you have left over is really yummy whisked into scrambled eggs before cooking – about 1 Tbsp. per egg.)
1 12-ounce package semisweet chocolate chips
4 1/2 cups sugar
13 ounces German’s brand sweet baking (green box) chocolate
(Again, 13 ounces is an odd amount. That’s 3 boxes, plus one or two extra squares. The recipe would probable be fine if you just used 12 ounces, but I haven’t tried it myself.)
2 teaspoons vanilla
1/2 tsp. salt
2 cups chopped pecans (optional, but recommended)
1 cup marshmallow cream (in a jar)

Butter a 13 X 9 inch (preferably glass) baking pan. Combine sugar, salt, butter and milk in a large pan sauce pan. Bring to a boil over low to medium heat and boil for 5 1/2 minutes, adjusting heat if necessary, to keep mixture from scorching. Remove from heat and add all other ingredients, except nuts. Beat/stir until well mixed. Stir in nuts, if desired. Pour into buttered pan. Let cool until solid, then cut into small square (about 1 1/2 inches on a side) pieces. Can be microwaved for a short time in a small container (coffee cup?) until melted to use for hot fudge ice cream sauce, if desired. Mmmmm……

fudge%20in%20pan.jpg

Swedish Spice Cookies with Sous Pastry Chef Girl

2 1/4 cups all-purpose flour 2 tsp baking soda 1 tsp ground cloves 1 tsp ground cinnamon 1 tsp ground ginger 1 tsp salt 3/4 cup softened unsalted butter (1 1/2 sticks) 1 1/4 cups sugar, divided 1 large egg 1/4 cup molasses Preheat oven to 375 degrees. Line ungreased baking sheets with parchment paper. … Continue reading “Swedish Spice Cookies with Sous Pastry Chef Girl”

cookies%20-%20done.jpg

2 1/4 cups all-purpose flour
2 tsp baking soda
1 tsp ground cloves
1 tsp ground cinnamon
1 tsp ground ginger
1 tsp salt
3/4 cup softened unsalted butter (1 1/2 sticks)
1 1/4 cups sugar, divided
1 large egg
1/4 cup molasses

cookies%20-%20mise%20en%20place.jpg

Preheat oven to 375 degrees. Line ungreased baking sheets with parchment paper.

cookies%20-%20girl%20mixing%20dry%20ingredients.jpg

Sift together flour, baking soda, spices and salt; set aside.

cookies%20-%20butter%20and%20sugar%20before%20creaming.jpg

Beat butter and 1 cup of the sugar in large bowl of electric mixer on medium-high speed until light (about 1 minute). Add the egg and molasses; mix well.

cookies%20-%20butter%20sugar%20molasses%20egg.jpg

Stop the mixer and add the flour mixture. Mix just until combined.

cookies%20-%20completed%20dough.jpg

Using about 1 Tbsp. of the dough for each, roll the dough into balls.

cookies%20-%20girl%20forming%20dough%20balls.jpg

We use long iced tea spoons (heaping) to scoop the dough out of the bowl. It’s very important to make them all as close to the same size as possible, so that they will all cook at the same rate.

cookies%20-%20girl%20rolling%20dough%20balls.jpg

Roll in the remaining 1/4 cup of granulated sugar so that they are fully coated. Arrange on baking sheets, spaced about 2 inches apart. If you prefer a thin, crisp cookie, they may be flattened with a glass that has been dipped in sugar.

At our house, we prefer cookies that are crisp on the outside and chewy in the middle, so we do NOT do the glass-flattening step, but place them on the cookie sheets in “balls”. Watch the cookies carefully as they bake – you want them to just be starting to “crust” a little on the outside, but still be a little soft in the middle. It’s a very fine line, for these cookies, between “chewy/delicious” and “tough/scorched”. You want to pull them out of the oven before they start to darken too much. They will spread a bit as they bake and “crack” open on their tops.

cookies%20-%20after%205%20minutes%20baking.jpg

Bake until set (about 11 minutes). I bake two cookie sheets at a time, so I switch the sheets from the bottom oven rack to the top oven rack halfway through the baking time, so that they don’t get too well done on either the bottom or the tops of the cookies. If you bake one tray at a time and don’t do this little “switcheroo”, they will take less time (about 9 – 10 minutes) to bake in total, since the oven won’t be opened and have a chance to cool down.

cookies%20-%20after%2010%20minutes%20baking.jpg

Transfer cookies to a wire rack and let cool. Makes about 3 dozen. Store in an airtight container and eat them within one week.

These are a great spicy, winter-y cookie, but they are just as delicious in the summer (with lemonade) as they are in the winter (with a frosty glass of milk or hot cup of coffee for dunking). These make a great holiday gift, too.

girl%20with%20cookie.jpg