The cats using the TOILET we expected, but not the toilet PAPER!

If you want to try this whole toilet training this at your house, I would suggest taking the roll of toilet paper off of the dispenser to prevent this sort of thing. Also: some of you have expressed concern about dirty cat paws on our toilet seats, but here’s the deal: if they’re not scratching … Continue reading “The cats using the TOILET we expected, but not the toilet PAPER!”

IMG_3960.jpg

IMG_3971.jpg

If you want to try this whole toilet training this at your house, I would suggest taking the roll of toilet paper off of the dispenser to prevent this sort of thing.

Also: some of you have expressed concern about dirty cat paws on our toilet seats, but here’s the deal: if they’re not scratching around in a stinky, nasty litter box, their paws won’t be dirty, right?

And rest assured that MUCH hand washing goes on between the toilet training and the cooking!

Cat Toilet Training Update and Instructions Part 1

OK, this blog is in danger of veering off into a completely different direction, but there does appear to be at least a little interest in the cat toilet training process, so here’s what we’re doing (a day or two for each step, but pay attention to your cat to see if you should go … Continue reading “Cat Toilet Training Update and Instructions Part 1”

OK, this blog is in danger of veering off into a completely different direction, but there does appear to be at least a little interest in the cat toilet training process, so here’s what we’re doing (a day or two for each step, but pay attention to your cat to see if you should go slower or if you can proceed faster):

Step 1: Move the litter box as close to the toilet as possible. Place the toilet with the seat down, but the lid up.
IMG_3972.jpg

Step 2: Raise the litter box up a bit (on something sturdy, so the cat won’t be nervous if it gets wobbly. We used plastic storage boxes from Target). Keep the toilet in the seat down, lid up position.
IMG_3973.jpg

Step 3: Raise the litter box up a little more. Keep the toilet in the seat down, lid up position. At this point, your cat may be jumping onto the toilet seat first and then jumping DOWN into the litter box. This is a good thing. We had problems with our cats attacking the toilet paper at this point, so you might consider removing it.
IMG_3974.jpg

Step 4. Place the litter box ON TOP of the toilet (your cat will figure out that he needs to jump up into it). You can leave a “stepstool” (like a plastic storage container) if you’re worried that your kitty won’t be able to make the jump in one step.
IMG_3975.jpg

Step 5: Find a metal bowl that will fit inside the toilet and rest it inside.
IMG_3976.jpg
Close the seat over it (leave the lid up) and place a couple of inches of cat litter inside the bowl.
IMG_3979.jpg

Step 6: As your cat/s uses the litter box/toilet/bowl device, scoop out the, umm, product and dispose of it. Don’t refill with fresh litter, but, instead, just allow the litter level in the bowl to gradually go down. The original instructions that I read said that you should try to gently catch your kitty “in the act” and move any paws that are not on the seat (but are, instead, in the bowl) as they are going (to encourage them to eventually “squat” with all four paws on the seat), but we’ve not been able to do that – our cats freak out when we approach them as they’re “going” and will jump down. I’m hoping that they will figure it out on their own when we reach the next step (gradually adding water to the bowl).

(This is the stage where we are with our cats right now, so I’ll leave off for now. Keep an eye out for Part 2 soon). We originally got this technique here (more info, less photos).

Pomegranates

Yeah, yeah, I know….not local, not organic, but these things are a veritable treasure trove of vitamins (B5, C mostly and PACKED with anti-oxidants) and the kids LOVE them. It’s kind of a pain to peel them and remove the seeds, but they are so beautiful that I don’t mind – they look like little, … Continue reading “Pomegranates”

IMG_3980.jpg

Yeah, yeah, I know….not local, not organic, but these things are a veritable treasure trove of vitamins (B5, C mostly and PACKED with anti-oxidants) and the kids LOVE them. It’s kind of a pain to peel them and remove the seeds, but they are so beautiful that I don’t mind – they look like little, juicy rubies. Mmmmm…

I’ve read about sprinkling them over dishes as a garnish, but haven’t ever done it, myself. I would imagine that they would be pretty fabulous in a very simple (and lightly dressed) salad. Dropping a few of them into the bottom of a glass of champagne is lovely and there are trillions of pomegranate cocktail recipes online. Get ’em while you can – pomegranate season is already waning.

Warren Buffett Blondies (cause they’re THAT RICH)

I don’t remember where I initially read about this pan, but I knew when I saw it that I HAD to have one. It allows you to bake lasagna, cookies, brownies, etc. and EVERY PIECE will have at least two sides of chewy, crispy edge (the best part, in my opinion). No more gooey, half-baked … Continue reading “Warren Buffett Blondies (cause they’re THAT RICH)”

IMG_3984.jpg

I don’t remember where I initially read about this pan, but I knew when I saw it that I HAD to have one.
IMG_3962.jpg
It allows you to bake lasagna, cookies, brownies, etc. and EVERY PIECE will have at least two sides of chewy, crispy edge (the best part, in my opinion). No more gooey, half-baked brownies from the inside of the pan? Sign me up!

I mentioned this pan to Hubby MONTHS ago and apparently (and uncharacteristically), he remembered. A box arrived today, addressed to Hubby and sent from “Bakers Edge”. Poor guy – he was going to try to surprise me and this was supposed to be part of my Christmas present, but the labeling gave him away. Of course, once I saw it, there was NO WAY that I could wait until Christmas to use it. I am NOTORIOUS for finding out about presents. I used to peek before Christmas when I was a kid (really sorry about that Holly Hobbie gazebo, Mom). I’m also AWFUL at keeping secrets (you’ve now been warned: don’t tell me any!), but I’m particularly awful at keeping secrets about gifts. When I was about 5, I told my newly-minted tennis enthusiast uncle that I couldn’t tell him what his birthday gift was, but that they were yellow and came three-to-a-can.

In addition to craving the pan, I’ve been craving Blondie bars (similar to a brownie without chocolate), ever since seeing the new Nancy Drew movie this summer (Nancy uses homemade lemon bars and blondies as bribes to elicit clues and confessions), so last night, when the pan arrived, my mission was clear.

Blondies
(inspired by Nancy Drew and Bakers Edge)

3 sticks butter, unsalted
2 cups light brown sugar, packed
1 cup dark brown sugar, packed
3 cups flour
1 Tbsp. baking powder
3/4 tsp. salt
3 eggs
1 Tbsp. vanilla extract, Mexican

Preheat oven to 325 degrees. Spray Bakers Edge (or 9 X 13) pan generously with cooking spray.

Stir together flour, salt, baking powder and set aside.

Melt butter in a large saucepan over medium heat and then add sugars. Cook butter-sugar mixture until thoroughly combined and bubbly. Set aside to cool for about 2 minutes.

While butter-sugar mixture cools, whisk eggs and vanilla in a large mixing bowl until slightly frothy. Slowly pour butter-sugar mixture into the eggs, whisking constantly (to keep eggs from scrambling – eww!). This is much easier if you have someone to help you: one of you pours, the other whisks. Add the flour mixture and stir to combine. The batter will be VERY thick and caramel-y at this point.

IMG_3964.jpg

Pour the batter into the prepared pan and bake for about 40 minutes or until batter is barely “set” and edges (mmmm….LOTS of them!) are nicely golden brown. They will very likely be a little sunken in the middle of each “row” if you cook them in a Bakers Edge pan – and that’s OK! Let cool, in the pan on a wire rack, for at least 10 minutes before cutting into serving pieces (DO NOT use metal utensils on your Bakers Edge pan).

Makes about 24 (depending upon how you cut them, of course).
You can add chopped nuts, dried fruit, baking chips – or whatever else might strike your fancy, if desired, but additions aren’t necessary – they are plenty good plain.

These are AMAZING and make your house smell SINFUL while they’re cooking. I didn’t think that anything could replace Swedish Spice Cookies in my family’s eyes, but these are giving them a run for their money. Imagine if shortbread and caramel had a love child…that’s what they’re like.

Cranberry Crock Pot Pork Tenderloin, Green Bean Casserole, Beets & Mashed Potatoes

My mother gave me this EASY Crock Pot Pork Tenderloin recipe many years ago. It’s super kid-friendly and very low fat. You can throw it in the Crock Pot and let it cook with you’re out shopping for presents or decorating the Christmas tree. Crock Pot Roast Pork Tenderloin with Cranberry Gravy 1 (two to … Continue reading “Cranberry Crock Pot Pork Tenderloin, Green Bean Casserole, Beets & Mashed Potatoes”

IMG_3939.jpg

My mother gave me this EASY Crock Pot Pork Tenderloin recipe many years ago. It’s super kid-friendly and very low fat. You can throw it in the Crock Pot and let it cook with you’re out shopping for presents or decorating the Christmas tree.


Crock Pot Roast Pork Tenderloin with Cranberry Gravy

1 (two to three pound) pork tenderloin
1 can whole cranberry sauce
1/2 cup cranberry juice (not cranberry juice cocktail)
1/2 cup sugar (I usually cut this just a bit)
1 tsp. dry mustard powder
1/4 tsp. ground cloves
2 Tbsp. cornstarch

Put cranberry sauce, juice, sugar, mustard and cloves in crock pot. Stir with a whisk to thoroughly combine. Add pork tenderloin. Set crock pot to cook for 8 to 10 hours on low setting.

IMG_3929.jpg

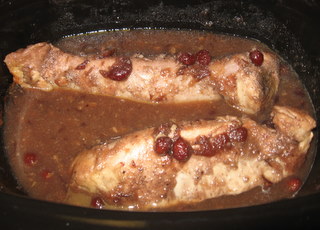
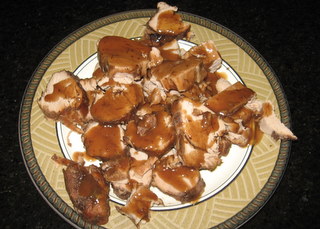
When the timer goes off, carefully pull pork loins out of crock pot (leaving sauce) and set aside to rest on a cutting board.

Carefully pour gravy from crock pot into a small saucepan. Add the cornstarch and whisk thoroughly to combine. Cook over medium-low heat until gravy has thickened to serving consistency. If you are serving picky eaters who might be turned off by the whole cranberries, you may puree the gravy with an immersion blender.

Slice tenderloin (1/2 inch to 3/4 inch thick). Place it on a serving platter and drizzle with the cranberry gravy. Serve the rest of the gravy on the side.

IMG_3938.jpg

Everyone liked this recipe, but it is on the “sweet” side, so you may not care for it if you don’t care for “sweet” meat sauces (Hubby prefers savory/herb/garlic-type dishes). I just found this similar (but maybe less sweet) recipe on Epicurious. I think it might be good, too, and might be possible to adapt for the Crock Pot. I may give it a try sometime soon.

Our brother-in-law, who is a great cook, made a homemade version of the classic Campbell’s green bean casserole for Thanksgiving and I’ve been craving it again ever since, so I decided to try to recreat it for dinner last night.


Homemade French Fried Onions

IMG_3930.jpg

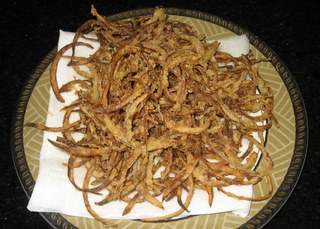
about 1 and 1/2 cups VERY thinly sliced red onion
about 1 cup milk
about 1 cup flour with a little salt (1/2 tsp?) mixed in
oil for frying (I used a blend of peanut and canola)

Soak the onions in the milk for about 5 minutes while you eat the oil to about 350 degrees in a deep skillet. Remove the onions from the milk a small handful at a time and dredge, in batches, through the flour to coat. Fry in the oil until onions are golden brown – be careful not to let them burn! Remove from oil and drain on paper towels. Set aside to cool. Try not to nibble too many of them while you assemble the rest of the casserole ingredients.


Homemade Cream of Mushroom Soup

IMG_3934.jpg

1/4 to 1/2 cup butter
1/4 cup flour
1 pound sliced fresh mushrooms
2 cups liquid: milk, chicken stock, cream (or a combination thereof – I used the milk from soaking the onions, plus a little stock and cream)
1/4 to 1/2 tsp. dried thyme leaves
salt and pepper to taste

Saute mushrooms in 1/4 cup of the butter until softened. Remove mushrooms and set aside, leaving butter in the pan. Add the flour and stir to thoroughly combine, adding more butter if necessary to create a smooth, blended roux. Cook the roux over medium heat for 2 to 3 minutes until thickened. Slowly stir in the liquid and continue cooking until well combined and thickened to cream soup consistency. Chop the mushrooms up a little bit and add them back to the soup. Add the thyme and salt and pepper to taste.

Homemade Green Bean Casserole

IMG_3937.jpg

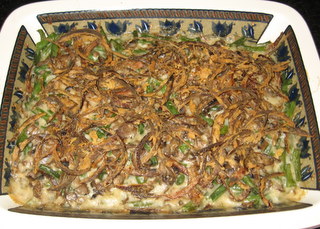
One batch Cream of Mushroom Soup
One batch French Fried Onions
2 (10 oz) packages frozen green beans, cooked according to package directions

Preheat oven to 350 degrees. Layer half of the green beans in a large rectangular casserole dish. Sprinkle with half of the onions.

IMG_3931.jpg

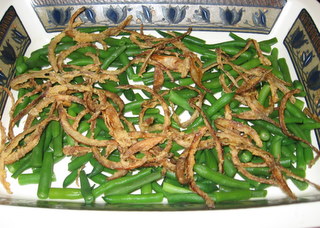
Layer in the rest of the green beans and then half of the remaining onions. Pour mushroom evenly over the whole casserole and top with the remaining onions.

IMG_3936.jpg

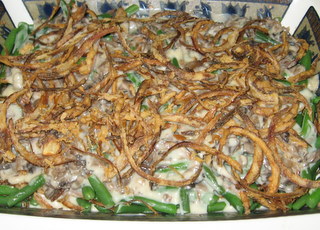
Cook for about 30 minutes or until the casserole is heated through and bubbly and the onions on top have browned a bit more.

This recipe was really good, but did have a much stronger mushroom flavor than the canned soup version. Hubby and I loved it, but it wasn’t a great big hit with my mushroom-doubting kiddos. I wouldn’t recommend making this for your kids unless they are mushroom lovers.

Cat Toilet-training update

OK, everybody: I’ll give you fair warning here. DO NOT scroll down if you are easily offended or don’t want to see photos of cats using the toilet. Really, this is your last chance to turn back….. I mean it – are you really sure you want to see these? OK, here ya go: Jack, … Continue reading “Cat Toilet-training update”

OK, everybody:
I’ll give you fair warning here. DO NOT scroll down if you are easily offended or don’t want to see photos of cats using the toilet.

Really, this is your last chance to turn back…..

I mean it – are you really sure you want to see these?

OK, here ya go:
IMG_3913.jpg
Jack, looking VERY annoyed that his good ol’ litter box has been replaced by this odd thing that the FEEDER BEINGS use.

IMG_3924.jpg
Ace, taking care of business.
(He had the gall to get into an elimination position that put his face out of the camera shot. How rude.)

We are now at the “metal bowl in the toilet” stage and are lowering the litter level daily. I anticipate that sometime early next week, we will begin adding water to the bowl, instead of litter. I am BEYOND excited about this project and really hope that it works. I would LOVE to be permanently free of a litter box for these guys.