Butternut Squash Bread Pudding

I made this savory bread pudding to take to our family Thanksgiving dinner. It’s from the new Cooking Light cookbook. The recipe can be found on their website here. This is the bread pudding before baking. Overall, I thought it was a really good recipe and would probably make it again, but for Thanksgiving, it … Continue reading “Butternut Squash Bread Pudding”

ButternutSquashPlate.jpg

I made this savory bread pudding to take to our family Thanksgiving dinner. It’s from the new Cooking Light cookbook. The recipe can be found on their website here.

ButternutSquashBreadPudding.jpg
This is the bread pudding before baking.

Overall, I thought it was a really good recipe and would probably make it again, but for Thanksgiving, it was maybe not the greatest choice, but it was too similar to the stuffing and having both at the same meal was a bit much. I might be tempted, in the future, to add a little chopped, sauteed celery to it and serve this INSTEAD of stuffing, but it’s definitely not necessary to have both. It was yummy, though, and rich. I used a really good parmesan (Reggiano, my favorite), so the cheese flavor really came through. The technique for cubing and then roasting the butternut squash was really handy, too, and I will probably prepare it again that way for adding to salads, veggie sautes, even an omelet or some cooked rice or pasta. The squash that I started with was HUGE, so I roasted all of it and froze what I didn’t need for this recipe, so watch out for butternut squash ravioli or risotto or soup or something on the blog really soon.

I also made a batch of the gnocchi – again – I think that I have them perfected now. They received rave reviews. I also made this salad again – also very well received. I also brought along a batch of the Swedish Spice cookies.

Grandma Louise’s Fudge

This fudge recipe is SUPER rich and delicious – very sinful. It’s VERY easy to make and makes a great holiday gift. My dad is absolutely powerless to resist this stuff. It was his mother’s recipe, but she passed away 11 years ago, so I make it for him every once in a while now. … Continue reading “Grandma Louise’s Fudge”

fudge%20on%20plate.jpg

This fudge recipe is SUPER rich and delicious – very sinful. It’s VERY easy to make and makes a great holiday gift. My dad is absolutely powerless to resist this stuff. It was his mother’s recipe, but she passed away 11 years ago, so I make it for him every once in a while now. It can be frozen for surprisingly periods of time without much ill effect. This should not be made on a rainy or very humid day – it won’t “set” properly.

I made this batch without nuts, at the special request of Girl, who is not a fan of most nuts. The nuts are optional, but it’s really much better with pecans in it. If you do add the nuts, though, make SOME effort to secure decent ones – the Planters in the bag from the supermarket will absolutely NOT do. Get good ones, even if you have to special-order them. There are lots of things that I do NOT like about living in Texas, but one of the good things is that we are able to secure really good pecans. My grandparents (on my mom’s side) are my “suppliers” and always seem to know a great local source. Thanks, Granny and Pappaw! I love you!

Grandma Louise’s Fudge

1/3 cup butter
1 can evaporated milk
(The original recipe says a 14 1/2 ounce can, but they don’t make those anymore, so I just use one 12 ounce can, plus a couple of ounces from another can to make 14 1/2 ounces. Any milk that you have left over is really yummy whisked into scrambled eggs before cooking – about 1 Tbsp. per egg.)
1 12-ounce package semisweet chocolate chips
4 1/2 cups sugar
13 ounces German’s brand sweet baking (green box) chocolate
(Again, 13 ounces is an odd amount. That’s 3 boxes, plus one or two extra squares. The recipe would probable be fine if you just used 12 ounces, but I haven’t tried it myself.)
2 teaspoons vanilla
1/2 tsp. salt
2 cups chopped pecans (optional, but recommended)
1 cup marshmallow cream (in a jar)

Butter a 13 X 9 inch (preferably glass) baking pan. Combine sugar, salt, butter and milk in a large pan sauce pan. Bring to a boil over low to medium heat and boil for 5 1/2 minutes, adjusting heat if necessary, to keep mixture from scorching. Remove from heat and add all other ingredients, except nuts. Beat/stir until well mixed. Stir in nuts, if desired. Pour into buttered pan. Let cool until solid, then cut into small square (about 1 1/2 inches on a side) pieces. Can be microwaved for a short time in a small container (coffee cup?) until melted to use for hot fudge ice cream sauce, if desired. Mmmmm……

fudge%20in%20pan.jpg

Swedish Spice Cookies with Sous Pastry Chef Girl

2 1/4 cups all-purpose flour 2 tsp baking soda 1 tsp ground cloves 1 tsp ground cinnamon 1 tsp ground ginger 1 tsp salt 3/4 cup softened unsalted butter (1 1/2 sticks) 1 1/4 cups sugar, divided 1 large egg 1/4 cup molasses Preheat oven to 375 degrees. Line ungreased baking sheets with parchment paper. … Continue reading “Swedish Spice Cookies with Sous Pastry Chef Girl”

cookies%20-%20done.jpg

2 1/4 cups all-purpose flour
2 tsp baking soda
1 tsp ground cloves
1 tsp ground cinnamon
1 tsp ground ginger
1 tsp salt
3/4 cup softened unsalted butter (1 1/2 sticks)
1 1/4 cups sugar, divided
1 large egg
1/4 cup molasses

cookies%20-%20mise%20en%20place.jpg

Preheat oven to 375 degrees. Line ungreased baking sheets with parchment paper.

cookies%20-%20girl%20mixing%20dry%20ingredients.jpg

Sift together flour, baking soda, spices and salt; set aside.

cookies%20-%20butter%20and%20sugar%20before%20creaming.jpg

Beat butter and 1 cup of the sugar in large bowl of electric mixer on medium-high speed until light (about 1 minute). Add the egg and molasses; mix well.

cookies%20-%20butter%20sugar%20molasses%20egg.jpg

Stop the mixer and add the flour mixture. Mix just until combined.

cookies%20-%20completed%20dough.jpg

Using about 1 Tbsp. of the dough for each, roll the dough into balls.

cookies%20-%20girl%20forming%20dough%20balls.jpg

We use long iced tea spoons (heaping) to scoop the dough out of the bowl. It’s very important to make them all as close to the same size as possible, so that they will all cook at the same rate.

cookies%20-%20girl%20rolling%20dough%20balls.jpg

Roll in the remaining 1/4 cup of granulated sugar so that they are fully coated. Arrange on baking sheets, spaced about 2 inches apart. If you prefer a thin, crisp cookie, they may be flattened with a glass that has been dipped in sugar.

At our house, we prefer cookies that are crisp on the outside and chewy in the middle, so we do NOT do the glass-flattening step, but place them on the cookie sheets in “balls”. Watch the cookies carefully as they bake – you want them to just be starting to “crust” a little on the outside, but still be a little soft in the middle. It’s a very fine line, for these cookies, between “chewy/delicious” and “tough/scorched”. You want to pull them out of the oven before they start to darken too much. They will spread a bit as they bake and “crack” open on their tops.

cookies%20-%20after%205%20minutes%20baking.jpg

Bake until set (about 11 minutes). I bake two cookie sheets at a time, so I switch the sheets from the bottom oven rack to the top oven rack halfway through the baking time, so that they don’t get too well done on either the bottom or the tops of the cookies. If you bake one tray at a time and don’t do this little “switcheroo”, they will take less time (about 9 – 10 minutes) to bake in total, since the oven won’t be opened and have a chance to cool down.

cookies%20-%20after%2010%20minutes%20baking.jpg

Transfer cookies to a wire rack and let cool. Makes about 3 dozen. Store in an airtight container and eat them within one week.

These are a great spicy, winter-y cookie, but they are just as delicious in the summer (with lemonade) as they are in the winter (with a frosty glass of milk or hot cup of coffee for dunking). These make a great holiday gift, too.

girl%20with%20cookie.jpg

Mexican Vanilla Ice Cream

Dr. Agatston, of South Beach Diet fame (see my last post), says that the two WORST diet disasters that you can inflict upon yourself are beer and ice cream, so let me just make it clear right now that Hubby and I will NOT eat this. Well, I won’t eat it anyway. Hubby, however, has … Continue reading “Mexican Vanilla Ice Cream”

Dr. Agatston, of South Beach Diet fame (see my last post), says that the two WORST diet disasters that you can inflict upon yourself are beer and ice cream, so let me just make it clear right now that Hubby and I will NOT eat this. Well, I won’t eat it anyway. Hubby, however, has absolutely NO willpower when it comes to ice cream, so I bet he’ll have some. I’d feel guilty for tempting him, but he’s lost more weight than I have, so I can sabotage his diet just a little, right? The idea, though, is that this is for the kids. We have a ton of leftover Halloween candy around here and thought it might be fun to “smush” some into ice cream, like at our favorite ice cream place. I like to make my own ice cream, so that I can use organic milk, cream, eggs, etc. Some wonderfully thoughtful friends (Thanks J and D!!!) even brought us back some organic Mexican vanilla (the best in the world – really!) from their trip this summer. Making your own ice cream is MUCH simpler than you might think, it just requires a bit of pre-planning. You need to allow enough time for the custard to cool before freezing and also you need to remember to put your ice cream freezer cylinder in your freezer (most require 24 hours). This is a great dessert to make for a dinner party, though – make the custard ahead of time (morning of the party or even the day before) and have it chilled in the fridge, then just pour it into the ice cream maker. By the time the coffee’s ready, you have ice cream. Your guests will be very impressed!

Mexican Vanilla Ice Cream

1 cup milk
(we use lowfat and it turns out fine – yes, I used to be one of those people that would order a chili cheeseburger, onion rings and a diet Coke)
1/2 cup sugar (see note below)
2 large eggs
2 cups heavy whipping cream
2 tsp vanilla extract (Mexican, if possible)

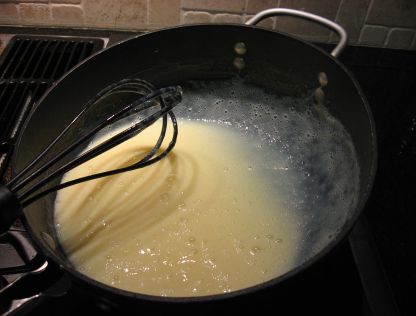
Warm the milk over low heat in a medium-sized saucepan. Whisk the sugar and eggs together in a separate medium-sized bowl. Slowly pour the warm milk into the egg/sugar mixture, while continuing to whisk.

NOTE: This is VERY important and may require someone else to help pour while you stir. If you pour too quickly, without enough stirring, the warm milk will cook the eggs too quickly and the finished ice cream will taste like scrambled eggs. Blech!

Here is the egg/sugar/milk mixture as it starts to cook:
ice%20cream%20custard%20cooking.jpg

Pour the mixture back into the pan and heat it slowly until thickened, stirring constantly (until it looks like very liquid pudding). Do NOT let this come to a boil (see “scrambled egg” warning above).

Here’s the egg/sugar/milk mixture, once it’s reached the right consistency:
ice%20cream%20custard%20cooked.jpg

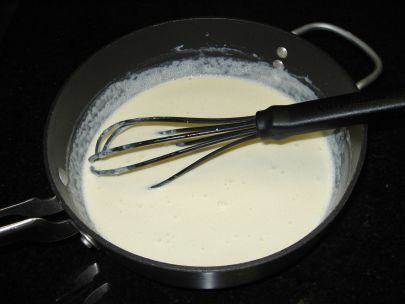
Remove from heat and let the custard cool to room temperature. Stir in the whipping cream and vanilla.

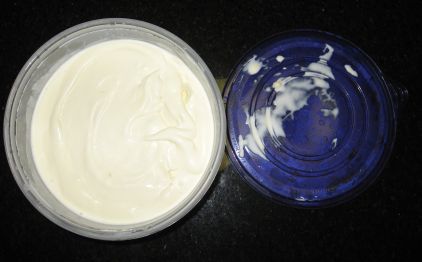
Here’s the custard, after adding the cream and vanilla:
ice%20cream%20after%20adding%20cream%20and%20vanilla.jpg

Pour custard into a Tupperware-type container and chill until thoroughly cooled. Freeze in your ice cream maker, following the manufacturer directions. Top with your favorite crushed candy bar, toasted nuts, etc.

If you happen to feel like getting REALLY fancy (and happen to have an extra $2 or so on hand to buy a vanilla bean), you can cut 1 whole vanilla bean in half, then cut it open (lengthwise) and add it to your custard right before cooking it (after mixing the milk and the eggs/sugar). Let the vanilla bean sit in the custard as it cools. OMIT the vanilla extract if you do this. Right before freezing, remove the vanilla bean and scrape out all of the tiny seeds inside, discarding the outer bean pod afterwards. Then you’ll have “Vanilla Bean” ice cream, with the authentic little vanilla specks. This is Hubby’s favorite.

NOTE on sugar: I like to use organic cane sugar for most recipes. It’s organic, first of all, but it also has a richer, molasses/brown sugar taste, because it’s unrefined. It is darker and does have larger granules, though, so I wouldn’t recommend it for any recipe where the sugar doesn’t really have a chance to be heated/cooked enough to dissolve well. I would NOT use it for things like: meringue, sweetened whipped (Chantilly) cream or rimming a cocktail glass. You need finer, whiter sugar for that. But, I do love the cane sugar flavor for cookies, muffins, custards, adding to hot beverages, etc.

Here’s the ice cream, freezing in the machine:
ice%20cream%20in%20freezer.jpg

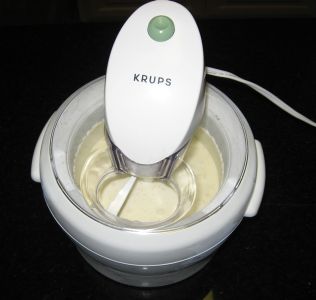
Speaking of ice cream makers, have any of you ever used one of these?
I’m thinking of getting one for a friend’s children for Christmas. It looks like it would be really fun, even though it only makes a little bit of ice cream at a time.

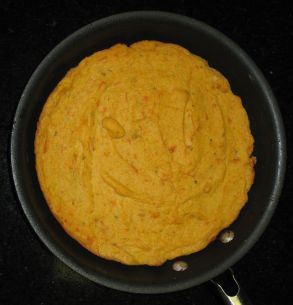
Here’s the finished ice cream, in a storage container to finish freezing to serving consistency:
finished%20ice%20cream%20in%20storage%20container.jpg

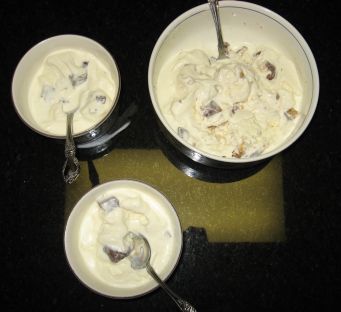
Here it is, ready for serving, with the candy inside. Boy and Hubby put Reese’s in theirs, Girl chose a Crunch bar. The ice cream was still a little soft, but gets a little “harder” after it has been in the fridge overnight.
IMG_1669.JPG

Healthy Veggie Mini-Quiches

This recipe is adapted from a recipe in The South Beach Diet by Dr. Arthur Agatston. Hubby and I have had much success with this diet. I lost about 20 pounds and Hubby lost 35 or so. I can’t recommend this diet enough. I have issues with low blood sugar/hypoglycemia. I also love to exercise … Continue reading “Healthy Veggie Mini-Quiches”

Mini%20Breakfast%20Quiches.jpg

This recipe is adapted from a recipe in The South Beach Diet by Dr. Arthur Agatston. Hubby and I have had much success with this diet. I lost about 20 pounds and Hubby lost 35 or so. I can’t recommend this diet enough. I have issues with low blood sugar/hypoglycemia. I also love to exercise and this diet gives me plenty of energy (plenty of protein). You never feel hungry or deprived and the food is pretty tasty. It’s definitely a diet for someone who loves to cook. In fact, you MUST love to cook to be on this diet, because it pretty much requires you to make three meals a day, at least in the early stages. But, the food is varied and tasty, with lots of flavor from fresh herbs, veggies and nuts. FYI – Girl will eat these, but Boy will not.

Healthy Veggie Mini-Quiches

1 1/2 cups Egg Beaters or other egg substitute
3/4 cup reduced-fat cheese (we like cheddar, but ricotta is good, too)
1/2 cup roasted red peppers, coarsely chopped
(Make these yourself and freeze to be used as needed; do NOT use the oil-packed ones. If you don’t have these on hand, then use fresh bell peppers instead)
1/4 cup chopped red onion, sauteed in a tiny bit olive oil or “no trans fat” margarine (we like Benecol) until soft
1 10-ounce package frozen chopped spinach, thawed and squeezed well to remove excess water
a dash of your favorite hot sauce, if desired
1 Tbsp. of your favorite chopped herb (parsley, basil or tarragon are all good), optional

Preheat oven to 350 degrees. Line a 12-cup muffin pan with foil baking cups. Mix all ingredients together and pour (a 1/4 cup measuring cup works great) equal amounts in each muffin cup. Bake for 25 minutes. These can be stored in the fridge for 3 days or frozen for longer. (Remove the foil cup before reheating them in the microwave!) A serving is two quiches.

NOTE: My recipe has more egg substitute and the quiches are a little larger than Dr. Agatston’s, so if you’re following the SB diet very strictly, be aware that this is a slightly larger portion than he suggests. I eat these before working out, so I need a little bit more “fuel” to keep me going.

Sweet Potato Gnocchi, Volume 2

I made another batch of these gnocchi today. I didn’t cook the sweet potato as long as I did the first time (not intentionally), so when I went to mash it into the dough, it didn’t “mash” as evenly and smoothly as it did the first time and I was left with some small chunks … Continue reading “Sweet Potato Gnocchi, Volume 2”

I made another batch of these gnocchi today. I didn’t cook the sweet potato as long as I did the first time (not intentionally), so when I went to mash it into the dough, it didn’t “mash” as evenly and smoothly as it did the first time and I was left with some small chunks of sweet potato in the dough (see photo below). I’m sure they will end up fine, since they will be boiled before eating and the sweet potato will soften up, but the dough did require quite a bit of flour (3/4 cup?) to roll it out, when it didn’t require ANY the first time. So, if any of you decide to make these, make sure that your sweet potatoes are cooked VERY well – soft enough to mash smoothly without any lumps. It’s only a difference of a minute or two in the microwave, but it will make your life MUCH easier when you go to shape the gnocchi. It also seems to help to chill the dough in the fridge for a while (even overnight) before rolling it out. I did that last time, but did not do it this time. I also skipped the whole fork-rolling thing. It didn’t make any difference in how they tasted or how they cooked, and once they boiled and swelled a bit, you couldn’t see that little detail, anyway. I’ve also discovered that you should just ignore the recommended boiling time. Just boil them until they float to the top of the pan – that is the traditional (non-sweet potato) gnocchi cooking technique. It works fine for these, too, and is much easier than timing. They turn out just right this way. Girl helped me make these. We are freezing some of them and will try to pull them out and cook them tomorrow to see how they hold up to the freezer.

freezer%20gnocchi.jpg

A tray of gnocchi, ready to go in the freezer. I’m going to freeze them on the tray until they freeze solid, and then will transfer them to a big Ziploc bag. I’m planning to put them right in the boiling water, without thawing them first. Jennifer – I’ll let you know how they turn out!

Sun-Dried Tomato Pesto Cream Sauce

This is adapted from a recipe that we learned at a Whole Foods Market cooking class. When we prepared this in class, it was served over homemade ravioli stuffed with spinach, ricotta and parmesan. It was delicious, but was a little bit too rich, with cheese in both the ravioli and the sauce, so I … Continue reading “Sun-Dried Tomato Pesto Cream Sauce”

Pasta.jpg

This is adapted from a recipe that we learned at a Whole Foods Market cooking class. When we prepared this in class, it was served over homemade ravioli stuffed with spinach, ricotta and parmesan. It was delicious, but was a little bit too rich, with cheese in both the ravioli and the sauce, so I served this over plain pasta. In this version, I switched half-and-half for heavy cream and cut the amount a little bit. I also used dry-pack tomatoes, instead of oil-packed.


Sun-Dried Tomato Pesto Cream Sauce

20 sun-dried tomatoes (dry-packed), soaked in warm water for 5 – 10 minutes to soften
(You could also substitute 2 or 3 of the tomatoes with smoke-dried tomatoes, for an extra flavor “punch”. Using ALL smoke-drieds in this recipe would be too strong a flavor, but a couple adds a great taste.)
4 cloves garlic
about 1/2 cup olive oil
1/2 cup toasted pine nuts
1/2 cup grated parmesan cheese
1/2 tsp. black pepper
1/2 tsp. salt
2 – 3 cups chicken stock
1/2 cup half-and-half
1/4 cup chopped fresh parsley
(you may substitute the appropriate amount – probably less – of another fresh herb here, if you prefer – basil would be good, or oregano)

Place the sun-dried tomatoes (drained), garlic, parmesan cheese and nuts in a food processor or blender and puree until uniformly chopped. Add half of the olive oil and about 3/4 cup of the chicken stock. Puree until the pesto is smooth, adding more oil or stock, if necessary. Pour the pesto into a medium-sized saucepan. Add the cream and enough additional chicken stock to reach your desired consistency. Bring to a gentle boil, then add salt and pepper. Simmer, slowly, about 5 minutes, adding more stock, if necessary. Remove from heat and stir in fresh chopped parsley. Serve over pasta of your choice.

This is enough sauce for 1 lb. of pasta (we used gemelli, or “twins”), with about 1 cup left over for another use. If you like your pasta really “saucy”, then go ahead and use the whole batch. This would be great with a little sliced, grilled chicken mixed in. I also may try spreading some of the sauce on chicken breasts before baking. This would also be a GREAT sauce for a baked pasta dish (ziti, etc.), although I would not do lasagna with it, since it might be too rich once the ricotta is added into the equation.

Pumpkin Pancakes & Maple Pumpkin Butter

Both of the kids had “testing” today. Boy is testing for his Blue Belt in Taekwondo and Girl has an academic test, so I wanted them both to have a really hearty breakfast. This mix that I found at Central Market fit the bill perfectly. I bought the Gingerbread Pancake mix, too, so we’ll be … Continue reading “Pumpkin Pancakes & Maple Pumpkin Butter”

PumpkinPancakes.jpg

Both of the kids had “testing” today. Boy is testing for his Blue Belt in Taekwondo and Girl has an academic test, so I wanted them both to have a really hearty breakfast. This mix that I found at Central Market fit the bill perfectly. I bought the Gingerbread Pancake mix, too, so we’ll be trying that soon. I’ve made Pumpkin and Gingerbread Pancakes from scratch before, with pretty good results (recipes later), but this was just so EASY (the mix requires the addition of 3/4 cup milk, 1 egg and 1 Tbsp. melted butter to 1 cup of mix). The Maple Pumpkin Butter is really good and doesn’t contain high fructose corn syrup (something we try to avoid), but is a more “adult” taste. Girl prefers powdered sugar on her pancakes and Boy just likes plain old (well OK, Grade “A” Organic) maple syrup on his, but I liked the pumpkin butter. I think it would be nice on toast or drizzled (maybe with some toasted pecans?) over cheesecake for a Fall-ish dessert. I am SO ready for Thanksgiving! Planning menus already!

PumpkinPancakeMix.jpg

Jack, the Cabinet Cat

This is what happens at our house when you leave the cabinets open while you’re cooking. Don’t worry; I got him out of there as soon as I took the photo – there aren’t any cat hairs in my rice cooker!

cabinet%20jack.jpg

This is what happens at our house when you leave the cabinets open while you’re cooking. Don’t worry; I got him out of there as soon as I took the photo – there aren’t any cat hairs in my rice cooker!

Herb Roasted Pork Tenderloin with Sweet Potato, Apple & Sage Spoon Bread

This is a truly great recipe – I can’t recommend it enough. Thanks to Jennifer for reminding me about it – we haven’t made it in a while. This is my #1 gun in my recipe “arsenal”. Everyone that I have served this to has asked for the recipe. Kids love it, too. I’ve even … Continue reading “Herb Roasted Pork Tenderloin with Sweet Potato, Apple & Sage Spoon Bread”

HerbRoastedPorkTenderloin.jpg

This is a truly great recipe – I can’t recommend it enough. Thanks to Jennifer for reminding me about it – we haven’t made it in a while. This is my #1 gun in my recipe “arsenal”. Everyone that I have served this to has asked for the recipe. Kids love it, too. I’ve even made the marinade up and frozen pork tenderloins IN the marinade, so that if I pull a tenderloin out of the freezer in the morning (or the night before is even better), then it can marinate while it thaws. Any leftovers are amazing in a sandwich the next day (with a little horseradish). This is also a great food to take to someone that has had a new baby, death in the family, has been ill, etc., since it’s so universally appealing. We have also taken this pork on a camping trip, with the meat frozen so that it would stay cool in the ice chest until the second camping night (our first night is always hot dogs, since we’re so busy setting up the campsite, tents, etc.). We wrapped the pork in foil and cooked it in the coals of our campfire. My father-in-law especially loves this and has even cooked it on the grill. Mmmmm…..

Herb-Roasted Pork Tenderloin (adapted from Southern Living)

1/4 cup soy sauce
1/4 cup Worcestershire sauce
1/4 cup vegetable oil
1 teaspoon dried thyme
1 teaspoon dried marjoram
1 teaspoon rubbed sage
1 teaspoon garlic powder
1 teaspoon onion powder
1 teaspoon ground ginger
1 teaspoon salt
1 teaspoon pepper
1 (1 1/2-pound) package pork tenderloins
(NOTE: if you are watching salt intake, you may either omit the salt or use low-sodium soy sauce, but I would not recommend doing both. This recipe is MUCH better with a tiny bit of salt.)

Stir together first 11 ingredients in a heavy-duty zip-top plastic bag. Prick pork with a fork, and place in marinade, turning to coat. Cover or seal; let stand at room temperature 30 minutes, or chill 2 hours or up to one day (longer is better). Place pork in a roasting pan. (The original Southern Living recipe instructed to remove the pork from the marinade and cook it on a rack, but I found that it’s MUCH more flavorful if you cook it with the marinade.)

Bake at 350° for 40 minutes or until a meat thermometer inserted into thickest portion registers 160° to 165°, depending upon your desired degree of doneness.

Slice tenderloin, spooning marinade over the top, or serving on the side. NOTE: Do NOT use marinade if you have not cooked the meat in it.

Yield: 8 servings

Sweet Potato, Apple and Sage Spoon Bread (click on title for recipe) This is another great Epicurious recipe.

Sweet%20Potato%20Spoon%20Bread.jpg

This was pretty yummy, fluffy, had a well-balanced flavor and was simple to make. Boy said he liked the consistency and said that it was a little like mashed potatoes, but Girl “didn’t care for it”. It has a really similar flavor to the Sweet Potato Gnocchi with Brown Butter and Sage, but not as rich. I guess that makes sense, because the two main ingredients (sweet potato and sage) are the same, except the gnocchi have a stick of butter melted over them! The cornmeal took much less time to absorb into the milk than the recipe instructed – I pretty much put the cornmeal in and it instantly “seized” and was absorbed into the milk. I did use lowfat (instead of whole) milk and yellow (instead of white) cornmeal, because that’s what I had on hand. I’m not sure that the apple added much to the flavor, so you could probably omit that and substitute a little more sweet potato (or just omit it altogether) without losing anything. I made a half-batch, since I didn’t need 10-12 servings, so it was only a half apple that I added, anyway.